NOTE: This post is being updated for today’s classroom (May 25, 2019)
Back in April 2013 when I first wrote this post, there were lots of great iPad apps for use in the classroom, but not all of us had access to school iPads. I knew quite a few teachers who had their own iPads (or iPad minis) so, of course, some teachers opted to use our own personal devices to bridge the gap.
Flash forward to May 2019, we have a world with divergent views on classroom technology, and mobile device use.
- Some Ontario school boards encourage a BYOD (bring your own device) model to supplement the meager classroom technology resources. For example, the Ottawa Catholic School Board (OCSB) partnered with Staples Canada to help “bring technology that supports learning in the classroom, as part of a Bring Your Own Device to School program” Source: Newswire.ca
- And on the flip side, starting in the 2019-2020 school year, Ontario students across the province won’t be allowed to “bring their cellphones to class unless teachers are using them for educational reasons” Source: TheStar.com
Of course, I’m biased. I highly approve of tech use in the classroom. There are pros and cons, absolutely. But, for me, the pros mostly outweigh the cons.
With Apple devices, iOS allow you to (kind of) lock down the device to a specific app. I say “kind of” because there are ways around it. More on that later…
There are lots of teachers out there who would never hand over their personal smartphone or tablet to a student. You’re just asking for trouble. The problem, of course, is that our iPads contain a lot of personal information that you don’t want your students rifling through: your contacts, emails, photos… Heck, you probably don’t want them flipping through your recently viewed movies on Netflix.
But there are lots of great reasons to use an iPad in the classroom: make a movie, create a stop motion animation, access accessibility features like voice over, or use a voice recording app so the student can demonstrate their understanding while drawing on the iPad. Some of us are brave (or crazy) enough to hand over our own personal devices to our students to use in the classroom.
Why would you want to know how to lock your iPad screen to one app?
Unfortunately, Apple iOS doesn’t allow us to have multiple user accounts which means there’s one single user account on your iPad for teachers, family members, students, etc.
This is one of the biggest downsides to having iPads in the classroom – multi-user management doesn’t really exist which means if you’re a teacher and you’re letting a student in your class use your own personal device, you run the risk of having students mess around with your stuff.
But, there is a way to lock your iPad screen to one app
There is a buried feature in iOS 6 that lets you lock your iPad and use only a specific app. You can disable all of the hardware buttons, the home button, and even parts of the touch screen so that a student can only use a specific app and not access your personal stuff.
A friend of mine recently showed me this trick at school, and I can’t believe it’s taken me so long to find it. (How long has it been since iOS 6 came out?)
How to lock your iPad screen on one app (use Guided Access)
Guided Access lets you lock down your iPad so a student can only access one app. I believe it was originally designed to help students with disabilities (i.e. students on the autism spectrum) remain on task and focused on content.
In reality, Guided Access is something that every teacher who uses an iPad in the classroom should know about.
Let’s be honest. Most students (and adults) get distracted when we’re working, and want to flip to a more interesting app (or text our friends.) Using Guided Access helps us lock the iPad screen to a single app. (Although, there is a way around this. Read on.)
How to Lock your iPad Screen on one app: PART 1. Set up Guided Access
- STEP 1. Click on the settings gear, and then click on GENERAL.
- STEP 2. On the right hand side, scroll down the General options until you find ACCESSIBILITY and click on that menu.

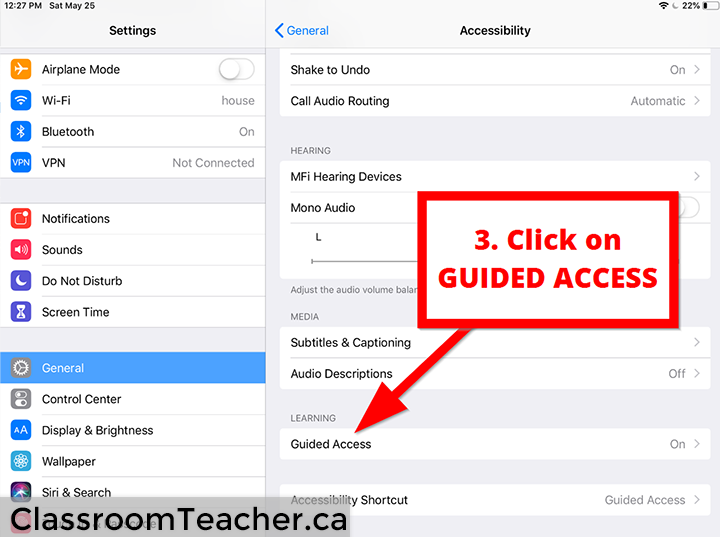
- STEP 3: In the Accessibility menu, scroll down until you find the learning section with the GUIDED ACCESS menu. Click on it.

Screenshot of iPad showing how to lock down your iPad – step 3 click on guided access
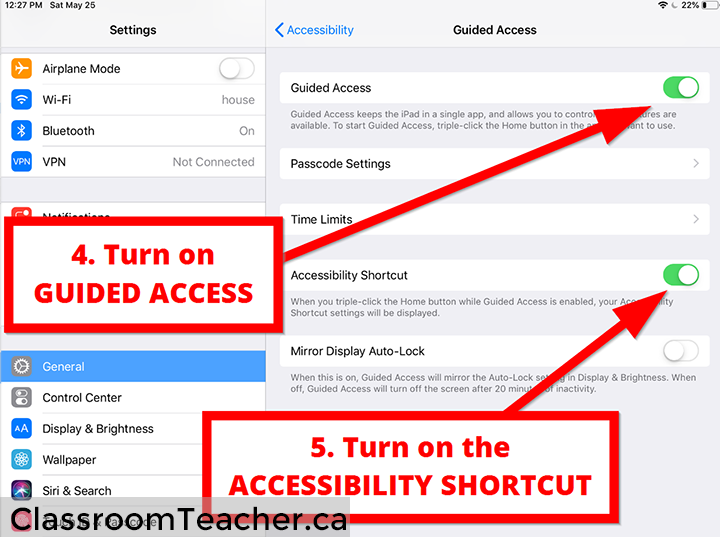
- STEP 4: In the Guided Access menu,

- You can set a passcode so that students cannot unlock the iPad.
- There is also a screen sleep mode which lets your iPad go to sleep to save power. (I haven’t had a chance to play with this yet.)
- In order to turn on guided access to lock your classroom iPad down, simply open up the app you want your students to use and then triple-click the home button. (If you have multiple accessibility features turned on, you may have to choose guided access from the menu that pops up.)
- You now have some more options before you lock down your iPad and hand it over to the student.
- The hardware buttons will always be disabled (i.e. the power button on the iPad 2, the home button, the volume buttons)
- You can choose whether you want to disable the entire screen. (You can also draw circles on the screen to create dead zones that students won’t be able to tap.)
- Finally, you can decide whether to allow the iPad to change orientation or allow movement. (This might be handy if you want to prevent students from tapping certain features in an app and the location of those buttons change if you’re holding the iPad vertically or horizontally.)
Benefits to using Guided Access to lock down classroom iPads
- Students can only access the one app. They can’t go exploring on your iPad, invading your privacy, seeing what apps you have, or impersonating you by sending emails / messages.
- Students can’t get distracted with other apps or randomly surf the internet (unless ofcourse it’s a web browser that you’ve locked them into. They also can’t check out your browsing history.)
- You can disable certain parts of the screen so students can’t touch the settings button or ads.
- You can prevent students from going in and messing with the settings on your iPad. (Sure, you can enable restrictions and prevent students from deleting apps, but what about the kid who hands back an iPad where all of the screen colours are messed up like this. Do you know how to return the iPad to normal? (Settings > General > Accessiblity > Invert Colours.)
Problems with using Guided Access to lock down iPads in the classroom
- The hardware buttons are disabled so you can’t use the volume buttons to increase or decrease the sound. (If there is a way to change the volume by touching the screen, then this isn’t a problem. But if you’re using Guided Access to lock students into iBooks and they’re highlighting text to read an eBook, then students can’t change the volume settings.)
- You’re locked into one app. (Of course, this goes without saying.) I know several teachers who think that locking down classroom technology is not the way to go… that students need to learn self-control and management skills and that those distractions are, in fact, teachable moments. If you’ve locked a student into iBooks (when they are having the iPad reading an eBook out loud), then you’ve also locked them out of independently going into the settings to change the speed at which the iPad reads highlighted text.
- If you’re using an iPad 2, there’s no way to turn off the power button if you’ve turned on guided access. All of the hardware buttons are disabled, so a student will need to return the iPad to a teacher so they can disable guided access. (If you’re using an iPad 3, the power button works and you can use that to turn off the power. When you turn on the iPad again, you’ll return to the app you were locked into.)
How to disable Guided Access
Although Guided Access does restrict you to one app, there are ways around it… and that’s a good thing. (Apparently there is a bug that sometimes locks you into guided access.)
- What do you do if a student locks you out on a school iPad?
- Or you forget the Guided Access password?
- Or, another teacher changes the Guided Access password on you? (After all, you set the guided access password in Settings > General > Accessibility > Guided Access, but when you turn on guided access in an app by triple-clicking the home button, you don’t have a chance to review or set your password. So, chances are, you’ll assume you know the password.)
Every time you enter the wrong password, your iPad will increase the amount of time you have to wait before you can try again. Guessing the password through brute force probably won’t work.
Holding down the power button (sleep / wake button) to reset the iPad won’t work either. You don’t get the little red slider button to shut down your iPad.
Here’s how to get out of an iPad locked with Guided access:
- If you do a hard reset by holding down the power button (sleep / wake button), you iPad will turn off.
- When you turn your iPad on again, you’ll be out of guided access mode.
- Go to Settings > General > Accessibility > Guided Access to turn it off.
(I’ve never had a problem getting out of Guided Access mode by using a hard reset, but apparently a few people have. Here’s another way using Find My iPhone.)
Leave a Reply