How to Draw on a Screenshot UPDATED (Dec 10, 2019): This post was originally written in 2013 – I used Dragon Naturally Speaking and talked about screenshots. The content is still relevant today and is slowly being updated. Stay tuned!
Back in 2013 when this post was originally written, I did a presentation for teachers about using technology. I used Google Slides and I threw in a couple of marked up screenshots from different web pages showing how to login or access various teacher sites. I thought it was a pretty basic presentation.
Afterward, a couple of teachers came up to me and talked about how impressive the presentation was. I think it was because I put pretty arrows on the screenshots.
A long time ago, I remember adding arrows, circles, and colored rectangles (to block out sensitive information) using Photoshop. This took way longer than I’d care to admit.
Then, Windows 7 (and later versions) came with a snipping tool that let you take a snapshot of part of your screen and mark it up with a pen. I thought this was incredible. You could highlight text and hand-draw circles around important stuff before you even saved your screenshot. You can also do this now on iPhones and iPads.
The problem is that my handwriting always looks a little messy.
Then I found Greenshot and Greenshot is way better than the snipping tool in Windows because you can quickly create neat and professional looking notes on your screenshots.
Plus, Greenshot is free. (Free for us to use, but it costs the developers money to update and improve. If you use it a lot, consider donating. I did.)
Here’s what I still love like about Greenshot:
- It has a simplified but powerful (AND FREE) graphic editor.
- Way easier to use than Photoshop (and free): You don’t have to worry about multiple layers. Just click the selection tool and you can edit / resize / change your markups.
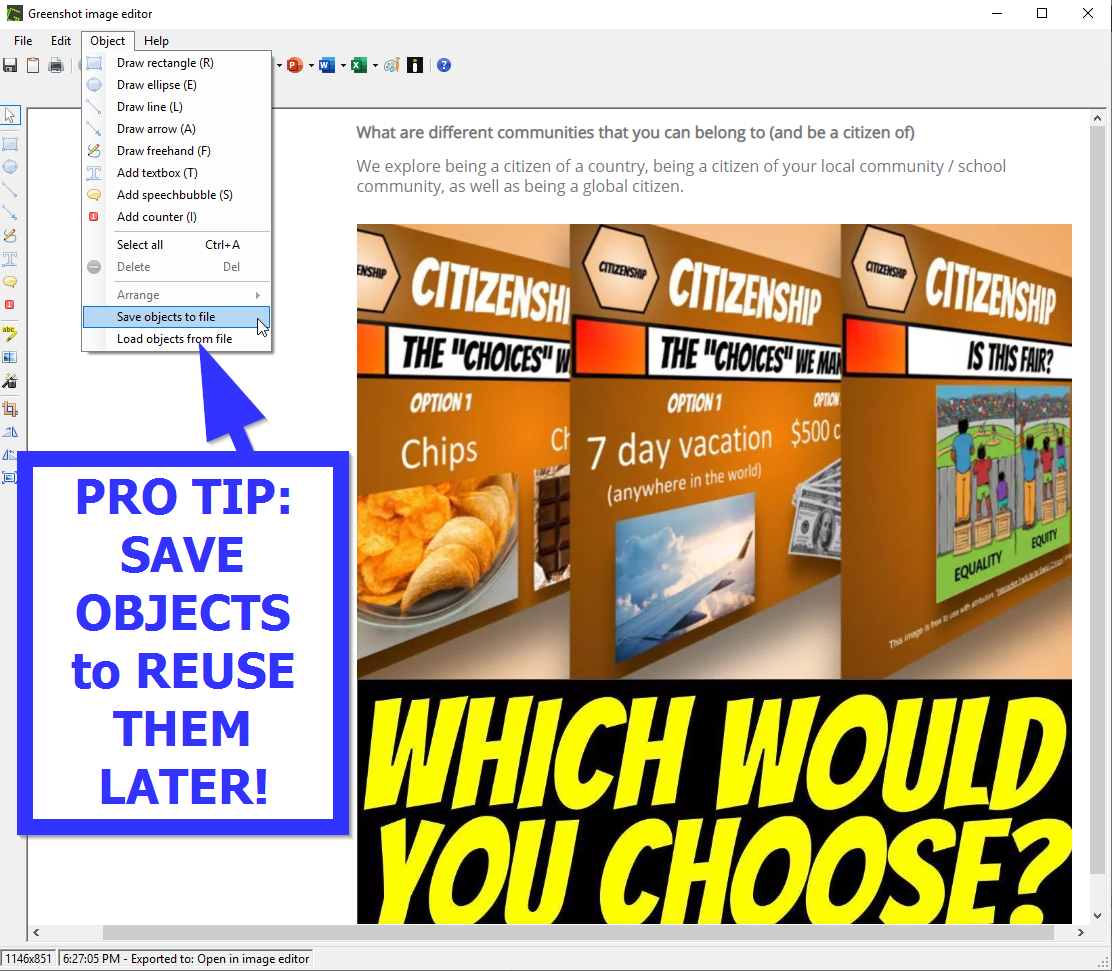
- PRO TIP: If you right-click on an object, you can still move the object up or down so that it’s in front of, or behind other objects.
- ANOTHER PRO TIP: You can save (export) and load (import) the arrows, text boxes, and other objects you create. So it’s easy to add identical objects on several different screenshots!
- Super easy to draw circles around stuff.
- Super easy to draw arrows. Greenshot remembers your last settings so all of your shapes and mark up can have the same style.
- And, super easy to add text.
- It’s easy to highlight text. You simply draw rectangles with the highlighter tool so you can highlight text or images.
- You can blur out (obfuscate) part of your screenshot to remove sensitive information.
- Add cool border effects like torn paper or drop shadow (or at a basic rectangle.)
- You can crop your screenshots before you save them.
- You can add shadows to all of your arrows, boxes and text to add a professional feel to your work.
There are other cool options.
- I have it set up so when I hit the print screen button, it lets me capture a region, but I could also set it up so that the print screen button captures the full screen, a specific application window, or just Internet Explorer.
- I use Greenshot to create tutorials (like this one), so I have it set up to automatically open the screenshot in the image editor, but I could just as easily set the destination to automatically open up in Microsoft Word, upload to dropbox, or just save to my computer.
- I also like how Greenshot gives me a magnifier when I’m trying to capture region, so I can make sure that I don’t get any unnecessary stuff.
How do I screenshot something on my computer
Here’s the DEFAULT SETTING:
- When you type this button on you keyboard, it takes a snapshot of your computer screen and saves it to your clipboard.
- If you go into Microsoft Word or Google Docs, or some program, you can paste the screenshot into your document. (The keyboard shortcut is CTRL V)
I don’t use the default screenshot settings on my windows laptop.
- Instead, I install Greenshot because I get more options and features (AND most importantly, OBJECTS that I can move on. It doesn’t get permanently painted onto the screenshot until I save it as a JPEG or PNG image.)
How to write and highlight screenshots – PRO TIP #1:
Students would ask me how to take a screenshot on our Windows laptops (which is different from a Chromebook), and I would tell them about Greenshot which was free software.
And then, inevitably, the question would come up and students would know where the print-screen button is, and I would have to show them on a keyboard.

How to write and highlight screenshots – PRO TIP #2:
My favourite part of Greenshot is that you can save your arrows, text boxes and other stuff to your computer and then load them up later on to use with a different screenshot!
How to add an arrow on snipping using Greenshot
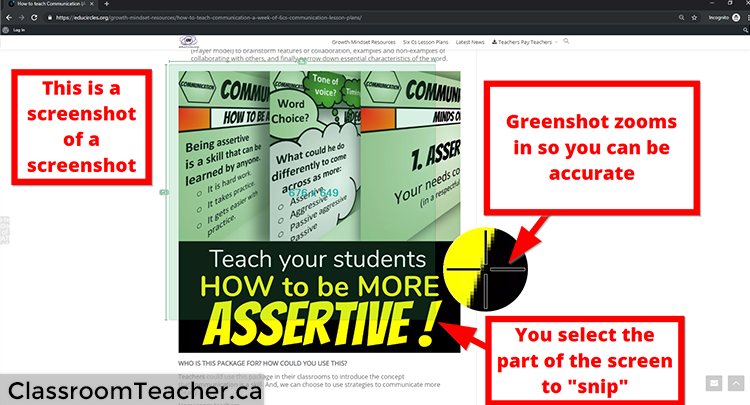
Super easy. Once you’ve installed Greenshot, when you hit the PRINT SCREEN button, it will open up a cross hair and you can select the part of the screen to “snip”
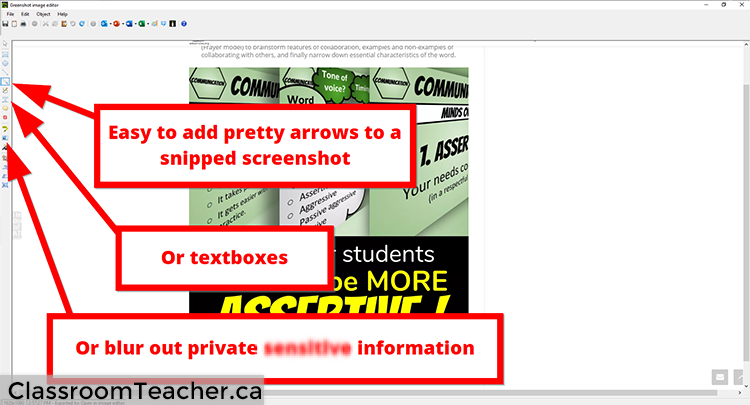
I then open up the image in the Greenshot Editor. On the left tool bar, you can easily…
- Add pretty arrows to your snipped screenshot
- Add boxes or text boxes to annotate your screenshot
- Blur out and pixelate (obfuscate) sensitive information on the screenshot.
The downside of Greenshot:
For me, the biggest downside of the free Greenshot editor is that right now, you can’t zoom / magnify or fit-to-window large images. I believe this is on the feature request list, but it’s a headache when you try to add text boxes to large screenshots.
Here’s an example. I took a few photos of different keyboards in my house to show where the “print screen” button is located. When I opened it in Greenshot, you couldn’t see the whole keyboard because the iPhone photo was too large.
(By the way, the way I got that screenshot of the original entire keyboard photo was to open the huge 4032 x 3024 iphone photo on my computer, and then screenshot the photo. (Then I pasted it into the Greenshot editor and it just treats it like another object. Cool, huh?)

How could you use screen capture software (in the classroom or beyond)?
Let’s say you want to showcase student work.
- If you are student handin work electronically, you simply open up the document of Google Docs, take a screenshot, and you can start highlight or underlined text. You can also blur out the student name or anything else that you don’t want the class to see.
- If the work is on paper, just snap a photo of the handwritten work using your phone. Upload the image to dropbox. Open the file on your computer and take a screenshot of the picture to get into Greenshot.
If you’re going to the computer lab, you could take a screenshot of the website that you want students to go to, and highlight or make jot notes directly onto the screenshot.
- That way, students have a visual reminder of what to do.
- Some of your students (with or without learning disabilities) will miss instructions the first time.
- Now, after your done walking students through what they have to do, you can put on the computer projector, a marked up screenshot reminding students what to do.
If you teach art class, you could snap a photo of student work or your teacher example, and markup important features that you want them to know.
If you teach in the science lab, you could snap a photo of equipment and then add arrows to the screenshot to show important safety features.
Hello,
My IT class wants me to label screenshots that I already have in my files. How would I do this?
J.Nunez
Hi Jay, thanks for reaching. Personally, I still use Greenshot to add notes, arrows, labels and stuff. It’s free and once you install the program, when you right click the icon at the bottom right of your screen, there’s an option to open the Greenshot editor using a file that you’ve already saved. I posted a screenshot on our twitter: https://twitter.com/classroomblog/status/1041390809701015553
Good luck!
Does the snipping tool for Windows 10 allow one to make a perfect circle or square, or do I need Greenshot? Thanks